En el ejemplo se muestra Como Filtrar en Excel por Cliente Filtro por Rango de Fechas, Crear un Gráfico en Excel con los Datos Filtrados y Generar Reporte o Exportar los Datos a Otro Libro de Excel.
Para manejar Excel en forma eficiente haz click acá, si quieres aprender sobre Excel, en inglés, entonces debes hacer click here. Si lo que necesitas es aprender o profundizar sobre la programación de macros con VBA este es unos de los mejores cursos on line que he visto en internet, te lo recomiendo no te arrepentirás.

Formatos Fecha y Hora Excel 
Conectar Excel y Access 
Enviar Mail con Excel 
Seleccionar o Referencia en VBA Excel
El vídeo verás la macro en acción con una explicación más detallada de su codificación y funcionamiento, recomiendo observar para una más fácil comprensión de la macro; suscribe a nuestro canal de You Tube para recibir en tu correo vídeos explicativos sobre macros interesantes, como por ejemplo Recorre fila buscando y comparando datos de dos columnas en hojas distintas, buscar en listbox mientras escribes en textbox, como crear una factura o sale invoice y grabar guardar PDF XLS y enviar por mail, trabajando con filas, celdas, columnas, rangos y muchos ejemplos más.
Como funciona el ejemplo que permite Filtrar por Cliente Rango de Fechas Mostrar Datos Filtrados en Listbox, Crea Grafico y Exportar a Otra Hoja EXCEL
Se sugiere descargar el ejemplo incluido en este post, una vez realizado se debe presionar el botón que se encuentra en la hoja de Excel, se muestra un formulario de Excel que contiene tres textbox, en el primero es para ingresar el cliente por el que se desea filtrar y los otros dos para ingresar fecha de inicio y fecha de fin para filtrar en Excel por fecha.
Los otros tres botones, en el primero se utiliza para filtrar por fecha una vez ingresadas las mismas, el segundo botón que tiene como ícono un gráfico permite generar el repote creando un gráfico y exportar a una hoja de Excel los datos contenidos en el listbox que se usa para mostrar los datos filtrados en el formulario.
La macro genera el informe en excel agregando una hoja denominada reporte en el mismo libro, en la imagen siguiente se aprecia el resultado de ejecutar la macro en excel.
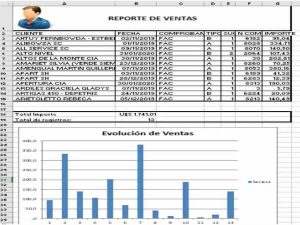
Paso a Paso como filtrar por cliente fechas, crear reportes
Filtrar por cliente y rango de fechas se explicó en estos pos en detalle:
Como filtrar por cliente rango de fechas e imprimir
Como filtrar por cliente rango de fechas y totalizar importes en listbox
Para no extender demasiado el post se mostrará como una vez realizado el filtro por cliente y filtro por rango de fechas en excel, como crear un gráfico y generar un reporte de excel vba avanzado.
En primer lugar se crear una hoja nueva denominada «Reporte», previo se borra dicha hoja por si existieran datos previos, se usan los códigos:
Sheets(«Reporte»).Delete
ActiveWorkbook.Sheets.Add After:=Worksheets(Worksheets.Count)
ActiveSheet.Name = «Reporte»
Luego se pasan datos de listbox a excel vba, con los siguientes códigos:
For x = 1 To UserForm1.ListBox1.ListCount – 5
a.Cells(x + 2, «A») = ListBox1.List(x, 0)
a.Cells(x + 2, «B») = CDate(ListBox1.List(x, 1))
a.Cells(x + 2, «C») = ListBox1.List(x, 2)
a.Cells(x + 2, «D») = ListBox1.List(x, 3)
a.Cells(x + 2, «E») = ListBox1.List(x, 4)
a.Cells(x + 2, «F») = ListBox1.List(x, 5)
a.Cells(x + 2, «G») = CDec(ListBox1.List(x, 6))
Next
Se le da formato al reporte avanzado en excel entre todos estos códigos se crean encabezados
a.Activate
a.Range(«A1») = «REPORTE DE VENTAS»
a.Range(«A2») = «CLIENTE»
a.Range(«B2») = «FECHA»
a.Range(«C2») = «COMPROBANTE»
a.Range(«D2») = «TIPO»
a.Range(«E2») = «SUC»
a.Range(«F2») = «N COMP»
a.Range(«G2») = «IMPORTE»
Se da formato de número con separador de miles y dos decimales, formato de fecha:
a.Range(«G2:G» & uf).NumberFormat = «#.#,0»
a.Range(«B2:B» & uf).NumberFormat = «dd/mm/yyyy»
Se da ancho automatico a columnas A a G y en la columna A se determina un ancho fijo:
a.Range(«A:G»).Columns.AutoFit
a.Range(«A:A»).ColumnWidth = 31
Luego se da formato de lineas a las celdas, estos son algunos de todos los códigos aplicados para dar formato de linea a las celdas y dejar la tabla de reporte en excel presentable.
With a.Range(«A2:G» & uf)
.Borders(xlEdgeLeft).LineStyle = xlContinuous
.Borders(xlEdgeLeft).Weight = xlThin
.Borders(xlEdgeTop).LineStyle = xlContinuous
.Borders(xlEdgeTop).Weight = xlThin
.Borders(xlEdgeBottom).LineStyle = xlContinuous
.Borders(xlEdgeBottom).Weight = xlThin
.Borders(xlEdgeRight).LineStyle = xlContinuous
.Borders(xlEdgeRight).Weight = xlThin
.Borders(xlInsideVertical).LineStyle = xlContinuous
.Borders(xlInsideVertical).Weight = xlThin
.Borders(xlInsideHorizontal).LineStyle = xlContinuous
.Borders(xlInsideHorizontal).Weight = xlThin
End With
Se agrega un logo al informe que puede ser el logo de la empresa, se usa el siguiente código
path1 = ActiveWorkbook.Path & «\clientes4.jpg»
Luego sigue algo importante que es como crear un gráfico en excel con macro, se establece el rango donde se ingresará el gráfico, dando altura ancho y posición en la hoja de excel, se usan los siguientes códigos,
Set ran = a.Cells(1, 1)
Set imag = a.Pictures.Insert(path1)
With imag
.Top = ran.Top
‘reducimos el alto y ancho de la foto
.Width = 20
.Height = ActiveCell.RowHeight – 2
.Left = ran.Left
End With
Se establece en forma automática donde están los datos que se usarán para hacer gráficos en Excel, los códigos VBA usados son los siguientes:
pf = 3
uf = a.Range(«G» & Rows.Count).End(xlUp).Row
uc = a.Cells(2, Columns.Count).End(xlToLeft).Address
wc = Mid(uc, InStr(uc, «$») + 1, InStr(2, uc, «$») – 2)
r = «G» & pf & «:G» & uf
Set ranchar = a.Cells(uf + 6, 1)
Se establecen donde están los datos que se le asignarán al gráfico en excel, como así también el titulo del mismo:
Range(r).Select
Set myChart1 = ActiveSheet.ChartObjects.Add(600, 300, 420, 300)
With myChart1
.Chart.SetSourceData Source:=Selection
.Chart.HasTitle = True
.Chart.ChartTitle.Text = «Evolución de Ventas»
.Top = ranchar.Top
.Left = 10
End With
Se guarda el arhivo de Excel, se cierra el formulario, se selecciona la hoja reporte creada y sale un mensaje que el reporte se creó exitosamente, se usa los códigos:
ActiveWorkbook.Save
Unload UserForm1
Sheets(«Reporte»).Select
MsgBox «El reporte se creo con éxito», vbCritical, «AVISO»
Quizá sea de utilidad también:
Como Filtrar por Cliente Rango Fechas e Imprimir
Código para filtra rangos de fechas en excel y generar reportes excel ejecutivos
Código que se inserta en Formulario de Excel VBA
Private Sub CommandButton1_Click()
Unload Me
End Sub
Private Sub CommandButton2_Click()
On Error Resume Next
Set b = Sheets(«Hoja1»)
uf = b.Range(«A» & Rows.Count).End(xlUp).Row
dato1 = CDate(TextBox2)
dato2 = CDate(TextBox3)
If dato2 = Empty Or dato1 = emtpy Then
MsgBox («Debe ingresar datos para consulta entre rango de fechas»), vbCritical, «AVISO»
Exit Sub
End If
If dato2 < dato1 Then
MsgBox («La fecha final no puede ser mayor a la fecha inicial»), vbCritical, «AVISO»
Exit Sub
End If
b.AutoFilterMode = False
Me.ListBox1 = Clear
Me.ListBox1.RowSource = Clear
‘Adiciona un item al listbox reservado para la cabecera
UserForm1.ListBox1.AddItem
If dato1 = Empty Or dato2 = Empty Then
For i = 2 To uf
dato0 = CDate(b.Cells(i, 2).Value)
If dato0 >= dato1 And dato0 <= dato2 Then
Me.ListBox1.AddItem b.Cells(i, 1)
Me.ListBox1.List(Me.ListBox1.ListCount – 1, 1) = b.Cells(i, 2)
Me.ListBox1.List(Me.ListBox1.ListCount – 1, 2) = b.Cells(i, 3)
Me.ListBox1.List(Me.ListBox1.ListCount – 1, 3) = b.Cells(i, 4)
Me.ListBox1.List(Me.ListBox1.ListCount – 1, 4) = b.Cells(i, 5)
Me.ListBox1.List(Me.ListBox1.ListCount – 1, 5) = b.Cells(i, 6)
Me.ListBox1.List(Me.ListBox1.ListCount – 1, 6) = b.Cells(i, 7)
End If
Next i
Else
If dato2 < dato1 Then
MsgBox («La fecha final no puede ser mayor a la fecha inicial»), vbCritical, «AVISO»
Exit Sub
End If
For i = 2 To uf
strg = b.Cells(i, 1).Value
dato0 = CDate(b.Cells(i, 2).Value)
If UCase(strg) Like UCase(TextBox1.Value) & «*» And dato0 >= dato1 And dato0 <= dato2 Then
Me.ListBox1.AddItem b.Cells(i, 1)
Me.ListBox1.List(Me.ListBox1.ListCount – 1, 1) = b.Cells(i, 2)
Me.ListBox1.List(Me.ListBox1.ListCount – 1, 2) = b.Cells(i, 3)
Me.ListBox1.List(Me.ListBox1.ListCount – 1, 3) = b.Cells(i, 4)
Me.ListBox1.List(Me.ListBox1.ListCount – 1, 4) = b.Cells(i, 5)
Me.ListBox1.List(Me.ListBox1.ListCount – 1, 5) = b.Cells(i, 6)
Me.ListBox1.List(Me.ListBox1.ListCount – 1, 6) = b.Cells(i, 7)
End If
Next i
End If
‘Carga los datos de la cabecera en listbox
For ii = 0 To 7
UserForm1.ListBox1.List(0, ii) = Sheets(«Hoja1»).Cells(1, ii + 1)
Next ii
UserForm1.ListBox1.AddItem
UserForm1.ListBox1.AddItem
UserForm1.ListBox1.AddItem
UserForm1.ListBox1.List(UserForm1.ListBox1.ListCount – 1, 0) = «Total Importe»
For x = 0 To UserForm1.ListBox1.ListCount – 1
t = CDec(UserForm1.ListBox1.List(x, 6))
tot = tot + t
t = 0
Next x
UserForm1.ListBox1.List(UserForm1.ListBox1.ListCount – 1, 1) = Format(tot, » «»U$S»» #,##0.00 «)
UserForm1.ListBox1.AddItem
UserForm1.ListBox1.List(UserForm1.ListBox1.ListCount – 1, 0) = «Total de registros:»
UserForm1.ListBox1.List(UserForm1.ListBox1.ListCount – 1, 1) = UserForm1.ListBox1.ListCount – 5
Me.ListBox1.ColumnWidths = «170 pt;70 pt;50 pt;50 pt;50 pt;50 pt;50 pt»
End Sub
Private Sub CommandButton3_Click()
Unload UserForm1
End Sub
Private Sub CommandButton4_Click()
Application.ScreenUpdating = False
Application.DisplayAlerts = False
On Error Resume Next
‘Elimina hoja y crea hoja dando el mismo nombre que la eliminada
Sheets(«Reporte»).Delete
ActiveWorkbook.Sheets.Add After:=Worksheets(Worksheets.Count)
ActiveSheet.Name = «Reporte»
Set a = Sheets(«Reporte»)
For x = 1 To UserForm1.ListBox1.ListCount – 5
a.Cells(x + 2, «A») = ListBox1.List(x, 0)
a.Cells(x + 2, «B») = CDate(ListBox1.List(x, 1))
a.Cells(x + 2, «C») = ListBox1.List(x, 2)
a.Cells(x + 2, «D») = ListBox1.List(x, 3)
a.Cells(x + 2, «E») = ListBox1.List(x, 4)
a.Cells(x + 2, «F») = ListBox1.List(x, 5)
a.Cells(x + 2, «G») = CDec(ListBox1.List(x, 6))
Next
a.Cells(x + 4, «A») = ListBox1.List(x + 2, 0)
a.Cells(x + 5, «A») = ListBox1.List(x + 3, 0)
a.Cells(x + 4, «B») = ListBox1.List(x + 2, 1)
a.Cells(x + 5, «B») = ListBox1.List(x + 3, 1)
a.Activate
a.Range(«A1») = «REPORTE DE VENTAS»
a.Range(«A2») = «CLIENTE»
a.Range(«B2») = «FECHA»
a.Range(«C2») = «COMPROBANTE»
a.Range(«D2») = «TIPO»
a.Range(«E2») = «SUC»
a.Range(«F2») = «N COMP»
a.Range(«G2») = «IMPORTE»
uf = a.Range(«G» & Rows.Count).End(xlUp).Row
a.Range(«G2:G» & uf).NumberFormat = «#.#,0»
a.Range(«B2:B» & uf).NumberFormat = «dd/mm/yyyy»
a.Range(«A:G»).Columns.AutoFit
a.Range(«A:A»).ColumnWidth = 31
With a.Range(«A2:G» & uf)
.Borders(xlEdgeLeft).LineStyle = xlContinuous
.Borders(xlEdgeLeft).Weight = xlThin
.Borders(xlEdgeTop).LineStyle = xlContinuous
.Borders(xlEdgeTop).Weight = xlThin
.Borders(xlEdgeBottom).LineStyle = xlContinuous
.Borders(xlEdgeBottom).Weight = xlThin
.Borders(xlEdgeRight).LineStyle = xlContinuous
.Borders(xlEdgeRight).Weight = xlThin
.Borders(xlInsideVertical).LineStyle = xlContinuous
.Borders(xlInsideVertical).Weight = xlThin
.Borders(xlInsideHorizontal).LineStyle = xlContinuous
.Borders(xlInsideHorizontal).Weight = xlThin
End With
With a.Range(«A2:G» & uf)
.Borders(xlEdgeLeft).LineStyle = xlContinuous
.Borders(xlEdgeLeft).Weight = xlMedium
.Borders(xlEdgeTop).LineStyle = xlContinuous
.Borders(xlEdgeTop).Weight = xlMedium
.Borders(xlEdgeBottom).LineStyle = xlContinuous
.Borders(xlEdgeBottom).Weight = xlMedium
.Borders(xlEdgeRight).LineStyle = xlContinuous
.Borders(xlEdgeRight).Weight = xlMedium
End With
With a.Range(«A» & uf + 3 & «:G» & uf + 4)
.Borders(xlEdgeLeft).LineStyle = xlContinuous
.Borders(xlEdgeLeft).Weight = xlMedium
.Borders(xlEdgeTop).LineStyle = xlContinuous
.Borders(xlEdgeTop).Weight = xlMedium
.Borders(xlEdgeBottom).LineStyle = xlContinuous
.Borders(xlEdgeBottom).Weight = xlMedium
.Borders(xlEdgeRight).LineStyle = xlContinuous
.Borders(xlEdgeRight).Weight = xlMedium
End With
With a.Range(«A1:G1»)
.Merge
.VerticalAlignment = xlCenter
.HorizontalAlignment = xlCenter
.RowHeight = 75
.Font.Size = 16
.Font.Bold = True
.Borders(xlEdgeLeft).LineStyle = xlContinuous
.Borders(xlEdgeLeft).Weight = xlMedium
.Borders(xlEdgeTop).LineStyle = xlContinuous
.Borders(xlEdgeTop).Weight = xlMedium
.Borders(xlEdgeBottom).LineStyle = xlContinuous
.Borders(xlEdgeBottom).Weight = xlMedium
.Borders(xlEdgeRight).LineStyle = xlContinuous
.Borders(xlEdgeRight).Weight = xlMedium
End With
path1 = ActiveWorkbook.Path & «\clientes4.jpg»
Set ran = a.Cells(1, 1)
Set imag = a.Pictures.Insert(path1)
With imag
.Top = ran.Top
‘reducimos el alto y ancho de la foto
.Width = 20
.Height = ActiveCell.RowHeight – 2
.Left = ran.Left
End With
UserForm1.Hide
pf = 3
uf = a.Range(«G» & Rows.Count).End(xlUp).Row
uc = a.Cells(2, Columns.Count).End(xlToLeft).Address
wc = Mid(uc, InStr(uc, «$») + 1, InStr(2, uc, «$») – 2)
r = «G» & pf & «:G» & uf
Set ranchar = a.Cells(uf + 6, 1)
Range(r).Select
Set myChart1 = ActiveSheet.ChartObjects.Add(600, 300, 420, 300)
With myChart1
.Chart.SetSourceData Source:=Selection
.Chart.HasTitle = True
.Chart.ChartTitle.Text = «Evolución de Ventas»
.Top = ranchar.Top
.Left = 10
End With
ActiveWorkbook.Save
Unload UserForm1
Sheets(«Reporte»).Select
MsgBox «El reporte se creo con éxito», vbCritical, «AVISO»
Application.DisplayAlerts = True
Application.ScreenUpdating = True
End Sub
Private Sub TextBox1_Change()
On Error Resume Next
Set b = Sheets(«Hoja1»)
uf = b.Range(«A» & Rows.Count).End(xlUp).Row
If Trim(TextBox1.Value) = «» Then
Me.ListBox1.RowSource = «Hoja1!A1:G» & uf
Exit Sub
End If
b.AutoFilterMode = False
Me.ListBox1 = Clear
Me.ListBox1.RowSource = Clear
dato1 = CDate(TextBox2)
dato2 = CDate(TextBox3)
‘Adiciona un item al listbox reservado para la cabecera
UserForm1.ListBox1.AddItem
For i = 2 To uf
strg = b.Cells(i, 1).Value
If UCase(strg) Like UCase(TextBox1.Value) & «*» Then
Me.ListBox1.AddItem b.Cells(i, 1)
Me.ListBox1.List(Me.ListBox1.ListCount – 1, 1) = b.Cells(i, 2)
Me.ListBox1.List(Me.ListBox1.ListCount – 1, 2) = b.Cells(i, 3)
Me.ListBox1.List(Me.ListBox1.ListCount – 1, 3) = b.Cells(i, 4)
Me.ListBox1.List(Me.ListBox1.ListCount – 1, 4) = b.Cells(i, 5)
Me.ListBox1.List(Me.ListBox1.ListCount – 1, 5) = b.Cells(i, 6)
Me.ListBox1.List(Me.ListBox1.ListCount – 1, 6) = b.Cells(i, 7)
End If
Next i
‘Carga los datos de la cabecera en listbox
For ii = 0 To 7
UserForm1.ListBox1.List(0, ii) = Sheets(«Hoja1»).Cells(1, ii + 1)
Next ii
UserForm1.ListBox1.AddItem
UserForm1.ListBox1.AddItem
UserForm1.ListBox1.AddItem
UserForm1.ListBox1.List(UserForm1.ListBox1.ListCount – 1, 0) = «Total Importe»
For x = 0 To UserForm1.ListBox1.ListCount – 1
t = CDec(UserForm1.ListBox1.List(x, 6))
tot = tot + t
t = 0
Next x
UserForm1.ListBox1.List(UserForm1.ListBox1.ListCount – 1, 1) = Format(tot, » «»U$S»» #,##0.00 «)
UserForm1.ListBox1.AddItem
UserForm1.ListBox1.List(UserForm1.ListBox1.ListCount – 1, 0) = «Total de registros:»
UserForm1.ListBox1.List(UserForm1.ListBox1.ListCount – 1, 1) = UserForm1.ListBox1.ListCount – 5
UserForm1.TextBox2 = Clear
UserForm1.TextBox3 = Clear
Me.ListBox1.ColumnWidths = «170 pt;70 pt;50 pt;50 pt;50 pt;50 pt;50 pt»
End Sub
Private Sub TextBox2_Change()
If Len(UserForm1.TextBox2) = 10 Then UserForm1.TextBox3.SetFocus
End Sub
Private Sub TextBox3_Change()
If Len(UserForm1.TextBox3) = 10 Then UserForm1.CommandButton2.SetFocus
End Sub
Private Sub UserForm_Initialize()
Dim fila As Long
Application.DisplayAlerts = False
Application.ScreenUpdating = False
Set b = Sheets(«Hoja1»)
uf = b.Range(«A» & Rows.Count).End(xlUp).Row
uc = b.Cells(1, Columns.Count).End(xlToLeft).Address
wc = Mid(uc, InStr(uc, «$») + 1, InStr(2, uc, «$») – 2)
With Me.ListBox1
.ColumnCount = 7
.ColumnWidths = «170 pt;50 pt;50 pt;50 pt;50 pt;50 pt;50 pt»
.RowSource = «Hoja1!A1:» & wc & uf
End With
Application.DisplayAlerts = True
Application.ScreenUpdating = True
End Sub
Private Sub UserForm_QueryClose(Cancel As Integer, CloseMode As Integer)
On Error GoTo Fin
If CloseMode <> 1 Then Cancel = True
Fin:
End Sub
Código que se inserta en módulo de VBA
#If VBA7 And Win64 Then
‘Si es de 64 bits
Public Declare PtrSafe Function ShellExecute Lib «shell32.dll» Alias «ShellExecuteA» (ByVal hwnd As LongPtr, ByVal lpOperation As String, ByVal lpFile As String, ByVal lpParameters As String, ByVal lpDirectory As String, ByVal nShowCmd As Long) As LongPtr
Public Declare PtrSafe Function FindWindow Lib «USER32» Alias «FindWindowA» (ByVal lpClassName As String, ByVal lpWindowName As String) As LongPtr
Public Declare PtrSafe Function GetWindowLongPtr Lib «USER32» Alias «GetWindowLongPtrA» (ByVal hwnd As LongPtr, ByVal nIndex As Long) As LongPtr
Public Declare PtrSafe Function SetWindowLongPtr Lib «USER32» Alias «SetWindowLongPtrA» (ByVal hwnd As LongPtr, ByVal nIndex As Long, ByVal dwNewLong As LongPtr) As LongPtr
Public Declare PtrSafe Function DrawMenuBar Lib «USER32» (ByVal hwnd As Long) As LongPtr
Public Declare PtrSafe Function RegOpenKeyA Lib «advapire32.dll» (ByVal hKey As LongPtr, ByVal lpSubKey As String, phkResult As LongPtr) As LongPtr
#Else
‘Si es de 32 bits
Public Declare Function ShellExecute Lib «shell32.dll» Alias «ShellExecuteA» (ByVal hwnd As Long, ByVal lpOperation As String, ByVal lpFile As String, ByVal lpParameters As String, ByVal lpDirectory As String, ByVal nShowCmd As Long) As Long
Public Declare Function FindWindow Lib «USER32» Alias «FindWindowA» (ByVal lpClassName As String, ByVal lpWindowName As String) As Long
Public Declare Function GetWindowLong Lib «USER32» Alias «GetWindowLongA» (ByVal hwnd As Long, ByVal nIndex As Long) As Long
Public Declare Function SetWindowLong Lib «USER32» Alias «SetWindowLongA» (ByVal hwnd As Long, ByVal nIndex As Long, ByVal dwNewLong As Long) As Long
Public Declare Function DrawMenuBar Lib «USER32» (ByVal hwnd As Long) As Long
Public Declare Function RegOpenKeyA Lib «advapire32.dll» (ByVal hKey As Long, ByVal lpSubKey As String, phkResult As Long) As Long
#End If
Sub muestra1()
UserForm1.Show
End Sub
Si te fue de utilidad puedes INVITARME UN CAFÉ y de esta manera ayudar a seguir manteniendo la página, CLICK para descargar en ejemplo en forma gratuita.
If this post was helpful INVITE ME A COFFEE and so help keep up the page, CLICK to download free example.


